FACING METHOD I
First, I want to thank Marti Plager for helping me with this tutorial. She spent a day teaching me two different methods of facing quilts. I have always admired the nice looking facings she has on her quilts, and I've wanted to learn her methods for quite some time. You can check out her quilts on her website at http://www.martiplager.com/. While you are there, take a close look at the corners of her quilts. They all look great.
This facing method makes a slightly rounded corner. I used a walking foot to put the facing strips on my quilt. ALWAYS square up your quilt before beginning the facing process.
1) Decide the orientation of the quilt. For this method, you will be sewing the strips for the facing onto the sides first.
2) Measure the sides of the quilt. Cut two 2 1/2" facing strips the length of this measurement.

3) Iron under 1/2" on one long side of each facing strip.
4) On the wrong side of each fabric strip (long edge--opposite the turned under edge), mark a dot at both corners 3/8” up from the long edge and 3/8” in from the short edge. This will serve as your pivot point when sewing.

5) Pin the facing strips to the sides of the quilt. The dots should be along the edge of the quilt; the turned under edge should be toward the quilt.

6) Using a 3/8” seam allowance, sew the two side facing strips to the quilt. Beginning at one of the short edges, sew down to the marked dot, pivot at the dot, continue sewing down the long edge of the strip, pivot at the dot, and continue sewing the short edge.
 (I apologize that this picture is a bit blurry. It is the best one I had that showed this step. You can see the turned-under 1/2" long edge just above the pin in this picture. Also, you can see the "dot/X," where you will be pivoting, at the corner.)
 (This is what it looks like after both long facing strips have been sewn.)


7) Cut the top and bottom facing strips (2 1/2" wide) just long enough to cover the turned under edges of the long facing strips and iron under 1/2" on one long side of each of these strips.


(This picture shows one facing strip at the top of the quilt and one on the table above the quilt. Notice the length--long enough to cover the turned under edges of the side facing strips.)
8) Pin the facing strips to the top and bottom and stitch using a 3/8” seam allowance.

9) Iron the top and bottom strips away from the quilt. Iron the side strips (as best you can) away from the quilt. (The side strips are hard to iron away from the quilt because the corners are stitched. Do the best you can.)


(This picture shows the facings ironed away from the quilt.)
10) Turn the quilt so the right side is up. Using a 1/8" seam, edge stitch the top and bottom facing.


(This picture shows the edge stitching on one of the top facing strips.)
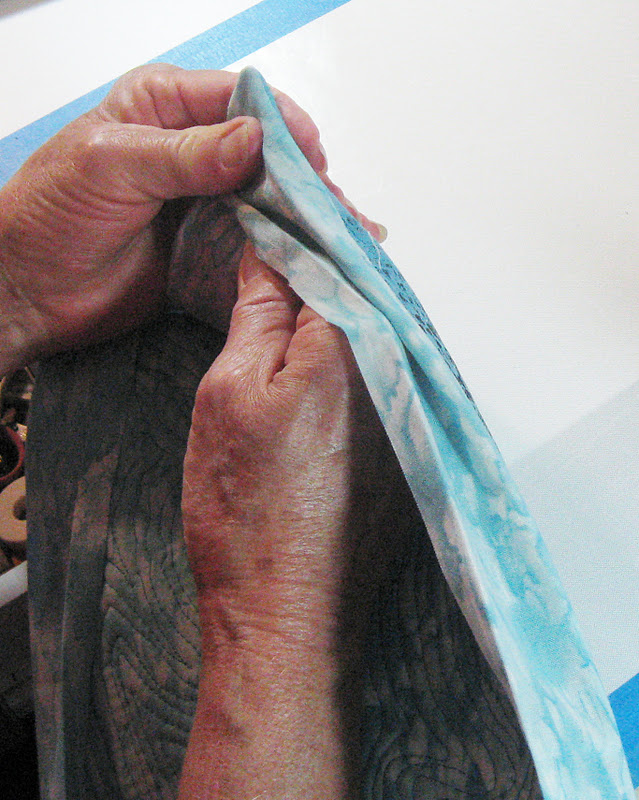
11) Edge stitch the side facings starting as far into the corner as you can. Continue to stitch down the straight away and into the next corner as far as you can without distorting the piece.
 (In this picture, one of the side facings is being edge stitched. Edge stitch as close to each corner as you can. This is a bit awkward because the corner has been sewn, and you can't open it up all the way.)

12) Trim the corners.

(This picture shows my friend trimming one of the corners of her quilt.)

(This is what one of my corners looked like after I trimmed it. This is a scary thing to do!)
13) Use a point turner to turn the corners. Be careful not to poke a hole in the corner.

14) Iron so that none of the facing fabric shows on the front of the quilt.


(This is what the back of my quilt looked like when I had all the facing strips ironed away from the front of the quilt.)
15) Hand stitch the facing strips to the back of the quilt. Be sure your stitches do not go through to the front of the quilt.
 (This is the finished product. Check out the corners. The quilt is actually square--it looks a bit skewed here, because I'm not a very good photographer!)

3 comments:
Found this post interesting. Had never thought of facing a quilt.I too am a follower of Marti Plager. "Q": Is the top and bottom strip turned under 1/2 inch too. Didn't look like it in the picture. Will definitely be trying this method. You mentioned two; 'Is this your favorite"?
Thanks,
Sandy
Sandy, yes, the top and bottom facing strips are turned under 1/2" also. This will give you a nice finished edge. The edge probably wasn't turned under when I took the picture. Probably the only place you could see that is in the picture of the back of the quilt right at the end of the post. If you click on the picture and click that picture again, it might be close enough for you to see that turned under edge.
Marti showed me two methods of facing a quilt. I will be posting the other method as soon as I get a chance to make up a sample following the directions I have written up. I like
to make sure I don't have any glaring errors before posting.
I don't have a favorite method yet; I haven't done either enough to decide on just one.
Good question. Thanks for the comment.
Thanks Beth for putting this up. Valerie showed me how to do this a few weeks ago...those River City Fiber Artists are leaving a strong art quilt legacy! :)
Post a Comment